ATLI X10 Time Lapse Camera
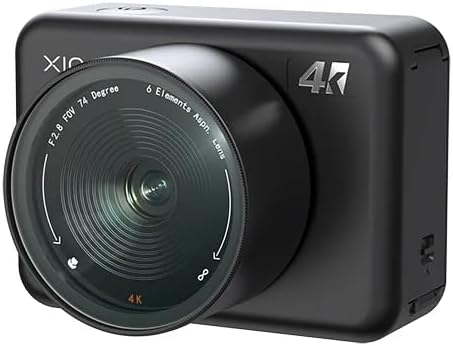
In general, my photography is usually focused on still images of all kinds. Portraits. Extreme macros. Long telephotos. Landscapes. Etc. I don’t generally shoot video as I find it much more difficult to frame, requiring more equipment and significantly more editing time than stills.
The one exception is making the very fast slow and the very slow fast. This post focuses on an easy way to make the very slow fast.
That is, timelapse captures to create videos where every frame may be seconds to minutes apart.
While cell phones can certainly take time lapse photos, they typically don’t provide a lot of control and, frankly, I’m not about to stick my phone on a tripod outside overnight.
Fortunately, dedicated time lapse cameras have come down in price considerably while also significantly increasing imaging quality.
Most recently, I’ve been using the ATLI X10 time lapse camera. It is a 4K camera that is controlled entirely via an iOS or Android app. Literally: there is a power button and 3 LEDs on the camera body. No display, no controls. Which is just fine because the in-body UI on these kinds of cameras is generally terrible and next to impossible to use in the field when trying to frame a shot and configure capture settings.
The X10 is relatively small and light. Easily mounted to any standard camera mount or tripod via the included ¼″-20 UNC bolt hole (more on that in a moment). There is a (proprietary, but they all are) battery slot, an SD card slot, and a USB-C charging port. It claims IP64 level of dust and water protection, but the “seals” are pretty basic and I wouldn’t trust it in anything beyond a light rain.
The app does require an annoying amount of account creation before use (I didn’t check if you can use the app without an account, but I suspect not). However, the discover tab in the app is a combination of pure marketing and a second tab of documentation and tutorials that are pretty well done. And while it does feature a bunch of community created videos, there doesn’t appear to be any sort of upload mechanism.
Beyond that, the app offers a me tab with basic account information, including notifications and the like. The last is the Camera tab. Dive into that to see your registered camera(s), select one and then the app will go through the connection process.
For the X10, the camera needs to be on and then the app first connects via Bluetooth (it can even wake over Bluetooth). Once connected, it will then switch to a WiFi connection either with a network created by the camera (useful when in the middle of a field somewhere) or by connecting to whatever existing network the camera is on.
The camera shows the typical preview image with various controls. Full auto vs. manual exposure, battery remaining, mode, settings, and the like. Nothing surprising and all fairly intuitive.
Assuming timelapse mode, hitting the record button brings up the recording UI. There is a NOW and a SCHEDULE tab at the top.
The Now tab allows you to control the interval (delay between frames in seconds), the duration of the timelapse, and whether you want to store it as an MP4 movie file or a series of JPGs for later processing. Click the record button and the camera will record for the interval and duration you set or until battery or storage runs out.
The Schedule tab allows you to configure the same interval and output options, but lets you set daily windows (up to 4) within which recording should take place.
Click the Start button in either mode and the camera starts recording. Close the app and get on with life as the camera will do its thing.
Once done recording, there is a per-camera gallery in the app where you can select timelapses for download or deletion.
Pretty straightforward and easy to use.

But to use it well requires some more tools and finesse. And a bit of practice and patience.
First, auto mode is probably not what you want to use. At least, not in any environment where the lighting isn’t a tightly controlled artificial source with consistent output.
To use the camera to capture images in variable lighting environments, like clouds passing by or a pond scene with periods of bright sun and relative dimness caused by cloud cover, you’ll want to use manual exposure mode to ensure consistent exposure (even if some segments end up being darker or brighter) or else you’ll end up with videos that weirdly pulse as the shutter changes to compensate for exposure in real time.
Select manual mode and dial the ISO to a fairly low number on a very bright day. Use something higher if shooting in the evening or a night sky. Likewise, dial the shutter speed until the preview image is clear and not washed out or too dim. Increasing the ISO increases light sensitivity, allowing a faster shutter speed in lower light conditions, enabling you to freeze motion at the expense of more noise in the image.
Record away.
With manual settings, though, you’ll want to determine if catching the beginning or the end of a variable light scene like a sunset/sunrise is more important. Because one end is gonna be too dim or washed out. It would be helpful if ATLI Cam+ provided an option to vary the exposure over time, scheduled or automatic, but the best you can do is stop recording and start a new recording with a corrected exposure, then stitch and adjust later (though you’ll end up with an abrupt brightness change).
As for frame interval, use a faster interval than you think you need. You can always slow down or speed up the video in post production and having more frames than you need will make the edits cleaner. If you are really concerned about quality, shoot to JPG images – to individual frames – and then use your favorite editing program to stitch it together.
One challenge in many shooting locations is camera mounting. A small tripod or the like will work sometimes, but you’ll often need to point the camera in an odd direction.
In my case, I found a mounting arm with a clamp at one end and a standard ¼″-20 UNC bolt at the other. Bunch of ball joints in between. Clamp the arm to something solid, loosen the ball joints, place the camera where you want, and then tighten down the ball joints. The arm pictured is quite adequate and relatively cheap, but I wouldn’t claim it is the best quality. I also suspect it isn’t going to work well for a full sized DSLR.
The patience bit?
You’ll want to set the camera up and then let it do its thing. Over and over. Catch every sunset. Every sunrise. Catch clouds moving, storms on the pond, whatever. Throwing out most. Dial in the settings. The camera comes with a relatively huge SD card that can store many days of footage (many more days than the battery will last).
Beyond previewing exposure on a single frame, you can’t really test the camera in a given environment without letting it run, potentially, for hours. Get comfortable with configuring it and you’ll gain confidence in set-it-and-forget-it for the one off / one chance captures like, say, a flower blooming.
Overall, the camera is a lot of fun. Enables me to capture all kinds of things that are too slow to see in real time and turn them into pretty amazing timelapse captures like the ones you see on this post. I’ll be posting more to the Timelapse page over time.
Comments
Send a comment via email